Tutorial/Beispiel für die Verwendung eines TouchScreen mit einem ARDUINO Mega
 |
| Als externes SubMenue für eine CNC Fräse o.ä. |
Bezugsquelle z.B.: https://eckstein-shop.de/32-inch-240×320-TFT-LCD-Display-mit-resistiveTouch-panel-fuer-Arduino
Arduino Library / Bibliothek hier gefunden: MCUFried TFT Display UNO y MEGA libraries.zip
ggf. auch hier – http://www.smokeandwires.co.nz/blog/a-2-4-tft-touchscreen-shield-for-arduino/
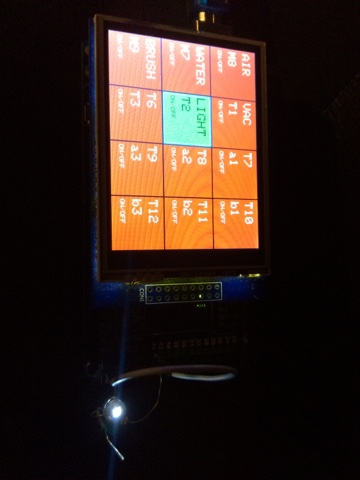
Ein Beispiel:
(Eine Push-Button-Oberfläche zum abfragen der digitalen Eingänge (InPort) mit einem PULLUP über Masse geschaltet und schalten der digitalen Ausgänge (OutPort).
[code]
// TFT size is 240×320
// Found * ILI9341 * LCD driver
// ———————————————-
// Befehle Beispiele:
// tft.reset();
// uint16_t identifier = tft.readID();
// tft.begin(identifier);
// tft.setRotation(rotation); – die Ausrichtung (0-3)
// tft.fillScreen(BLACK); – farbig füllen (in HEX)
// tft.setCursor(0, 0); – Curser Position setzen
// tft.setTextColor(WHITE); – Textfarbe (in HEX)
// tft.setTextSize(1); – Textgröße
// tft.println(“Hello World!”); – Text
// tft.drawLine(x1, y1, x2, y2, color); – Linie von x,y nach x,y in Farbe (in HEX)
// tft.drawFastHLine(0, y, w, color1); – horizontale Linie von x,y mit Länge in Farbe (in HEX)
// tft.drawFastVLine(x, 0, h, color2); – vertikale Linie von x,y mit Länge in Farbe (in HEX)
// cx = tft.width(); – TFT Breite
// cy = tft.height(); – TFT Höhe
// tft.drawRect(cx-i2, cy-i2, i, i, color); – Rechteck von Ecke x,y zur Ecke x,y in Farbe (in HEX)
// tft.fillRect(cx-i2, cy-i2, i, i, color1); – gefülltes Rechteck von Ecke x,y zur Ecke x,y in Farbe (in HEX)
// tft.fillCircle(x, y, radius, color); – gefüllter Kreis Mittelpunkt x,y mit Radius in Farbe (in HEX)
// tft.drawCircle(x, y, radius, color); – Kreis Mittelpunkt x,y mit Radius in Farbe (in HEX)
// tft.drawTriangle( – Dreieck
// cx , cy – i, // peak
// cx – i, cy + i, // bottom left
// cx + i, cy + i, // bottom right
// tft.color565(0, 0, i));
// tft.fillTriangle(cx, cy – i, cx – i, cy + i, cx + i, cy + i, – gefülltes Dreieck
// tft.color565(0, i, i));
// tft.drawRoundRect(cx-i2, cy-i2, i, i, i/8, tft.color565(i, 0, 0)); – Rechteck mit runden Ecken
// tft.fillRoundRect(cx-i2, cy-i2, i, i, i/8, tft.color565(0, i, 0)); – gefülltes Rechteck mit runden Ecken
#include <Adafruit_GFX.h> // Core graphics library
#include <Adafruit_TFTLCD.h> // Hardware-specific library
#include <TouchScreen.h>
#define LCD_CS A3 // Chip Select goes to Analog 3
#define LCD_CD A2 // Command/Data goes to Analog 2
#define LCD_WR A1 // LCD Write goes to Analog 1
#define LCD_RD A0 // LCD Read goes to Analog 0
#define LCD_RESET A4 // Can alternately just connect to Arduino’s reset pin
#define YP A3 // must be an analog pin, use “An” notation!
#define XM A2 // must be an analog pin, use “An” notation!
#define YM 9 // can be a digital pin
#define XP 8 // can be a digital pin
#define TS_MINX 180 //150
#define TS_MINY 200 //120
#define TS_MAXX 920 //920
#define TS_MAXY 940 //940
// For better pressure precision, we need to know the resistance
// between X+ and X- Use any multimeter to read it
// For the one we’re using, its 300 ohms across the X plate
TouchScreen ts = TouchScreen(XP, YP, XM, YM, 150);
#define BLACK 0x0000
#define BLUE 0x001F
#define RED 0xF800
#define GREEN 0x07E0
#define CYAN 0x07FF
#define MAGENTA 0xF81F
#define YELLOW 0xFFE0
#define WHITE 0xFFFF
Adafruit_TFTLCD tft(LCD_CS, LCD_CD, LCD_WR, LCD_RD, LCD_RESET);
#define BOXSIZE 80
#define PENRADIUS 3
#define MINPRESSURE 10
#define MAXPRESSURE 1000
#define BOX_COLORE_ON GREEN
#define BOX_COLORE_OFF RED
#define FRAME_COLORE_ON BLUE
#define FRAME_COLORE_OFF BLACK
#define TEXT_COLORE_ON BLACK
#define TEXT_COLORE_OFF WHITE
// ——————————————–
// define Title
// ——————————————–
String Title[4][3] = {
{“AIR”,”WATER”,”BRUSH”},
{“VAC”,”LIGHT”,”T3″},
{“a1″,”a2″,”a3”},
{“b1″,”b2″,”b3”}
};
// ——————————————–
// define GCode
// ——————————————–
String GCode[4][3] = {
{“M8″,”M7″,”M9”},
{“T1″,”T2″,”T3”},
{“a1″,”a2″,”a3”},
{“b1″,”b2″,”b3”}
};
// ——————————————–
// define uTitle
// ——————————————–
String uTitle[4][3] = {
{“ON/OFF”,”ON/OFF”,”ON/OFF”},
{“ON/OFF”,”ON/OFF”,”ON/OFF”},
{“ON/OFF”,”ON/OFF”,”ON/OFF”},
{“ON/OFF”,”ON/OFF”,”ON/OFF”}
};
// ——————————————–
// define default Status
// ——————————————–
boolean Status[4][3] = {
{0,0,0},
{0,0,0},
{0,0,0},
{0,0,0}
};
// ——————————————–
// define default InPutStatus
// ——————————————–
boolean inputStatus[4][3] = {
{1,1,1},
{1,1,1},
{1,1,1},
{1,1,1}
};
// ——————————————–
// define In Port
// ——————————————–
int inPort[4][3] = {
{52,50,48},
{46,44,42},
{40,38,36},
{34,32,30}
};
// ——————————————–
// define Out Port
// ——————————————–
int outPort[4][3] = {
{53,51,49},
{47,45,43},
{41,39,37},
{35,33,31}
};
void setup() {
//Temp 5V Ausgang:
// pinMode(22, OUTPUT);
// digitalWrite(22, 1);
uint16_t identifier = tft.readID();
Serial.begin(9600);
tft.reset();
tft.begin(identifier);
tft.setRotation(3);
InitScreen();
// Init PINs
pinMode(13, OUTPUT);
}
//——————————————–
// MAIN
//——————————————–
void loop() {
digitalWrite(13, HIGH);
TSPoint p = ts.getPoint();
digitalWrite(13, LOW);
// if sharing pins, you’ll need to fix the directions of the touchscreen pins
//pinMode(XP, OUTPUT);
pinMode(XM, OUTPUT);
pinMode(YP, OUTPUT);
//pinMode(YM, OUTPUT);
inWatcher();
if (p.z > MINPRESSURE && p.z < MAXPRESSURE) {
int Box_y;
int Box_x;
// scale from 0->1023 to tft.width
p.x = tft.height()-(map(p.x, TS_MINX, TS_MAXX, tft.height(), 0));
p.y = tft.width()-(map(p.y, TS_MINY, TS_MAXY, tft.width(), 0));
Box_x = xBox(p.x);
Box_y = yBox(p.y);
pushButton(Box_x,Box_y);
}
}
int xBox(int p_x){
int box;
if (p_x < BOXSIZE*1) {
box = 0;
}
else if (p_x < BOXSIZE*2) {
box = 1;
}
else if (p_x < BOXSIZE*3) {
box = 2;
}
return box;
}
int yBox(int p_y) {
int box;
if (p_y < BOXSIZE*1) {
box = 3; }
else if (p_y < BOXSIZE*2) {
box = 2; }
else if (p_y < BOXSIZE*3) {
box = 1; }
else if (p_y < BOXSIZE*4) {
box = 0; }
// DEBUG
// Serial.print(“P_Y = “); Serial.println(p_y);
// Serial.print(“box = “); Serial.println(box);
// Serial.print(“BOXSIZE = “); Serial.println(BOXSIZE);
return box;
}
void pushButton(int x, int y) {
switchOutput(y, x, !Status[y][x]);
delay(500);
}
void InitScreen() {
// ——————————————–
// InitScreen
// ——————————————–
tft.fillScreen(BLACK);
for (int y=0; y<4; y++)
{
for (int x=0; x<3; x++)
{
pinMode(inPort[y][x], INPUT_PULLUP);
pinMode(outPort[y][x], OUTPUT);
inputStatus[y][x] = digitalRead(inPort[y][x]);
switchOutput(y, x, !inputStatus[y][x]);
}
}
}
void inWatcher(){
for (int y=0; y<4; y++)
{
for (int x=0; x<3; x++)
{
boolean watchStatus;
watchStatus = digitalRead(inPort[y][x]);
if (!(watchStatus == inputStatus[y][x])) {
inputStatus[y][x] = !inputStatus[y][x];
switchOutput(y, x, !inputStatus[y][x]);
}
}
}
}
void switchOutput(int y, int x, boolean on) {
digitalWrite(outPort[y][x], on);
Status[y][x] = on;
if (on == 0)
tft.fillRect(BOXSIZE*y, BOXSIZE*x, BOXSIZE, BOXSIZE, BOX_COLORE_OFF), tft.setTextColor(TEXT_COLORE_OFF);
else if (on == 1)
tft.fillRect(BOXSIZE*y, BOXSIZE*x, BOXSIZE, BOXSIZE, BOX_COLORE_ON), tft.setTextColor(TEXT_COLORE_ON);
if (inputStatus[y][x] == 0)
tft.drawRect(BOXSIZE*y, BOXSIZE*x, BOXSIZE, BOXSIZE, FRAME_COLORE_ON);
else if (inputStatus[y][x] == 1)
tft.drawRect(BOXSIZE*y, BOXSIZE*x, BOXSIZE, BOXSIZE, FRAME_COLORE_OFF);
tft.setCursor(BOXSIZE*y+5, BOXSIZE*x+10);
tft.setTextSize(2);
tft.println(Title[y][x]);
tft.setCursor(BOXSIZE*y+5, BOXSIZE*x+35);
tft.println(GCode[y][x]);
tft.setCursor(BOXSIZE*y+5, BOXSIZE*x+60);
tft.setTextSize(1);
tft.println(uTitle[y][x]);
}
[/code]